Working on Posture
Last week I wrote about posture and provided a series of photo montages and progressions to help people work towards better archery posture. All the photos were taken while in alignment with the drawing elbow. Let’s look at posture this week from a different angle, facing the archer (Coaching position 1) and go through a progression designed to help people find better skeletal alignment.
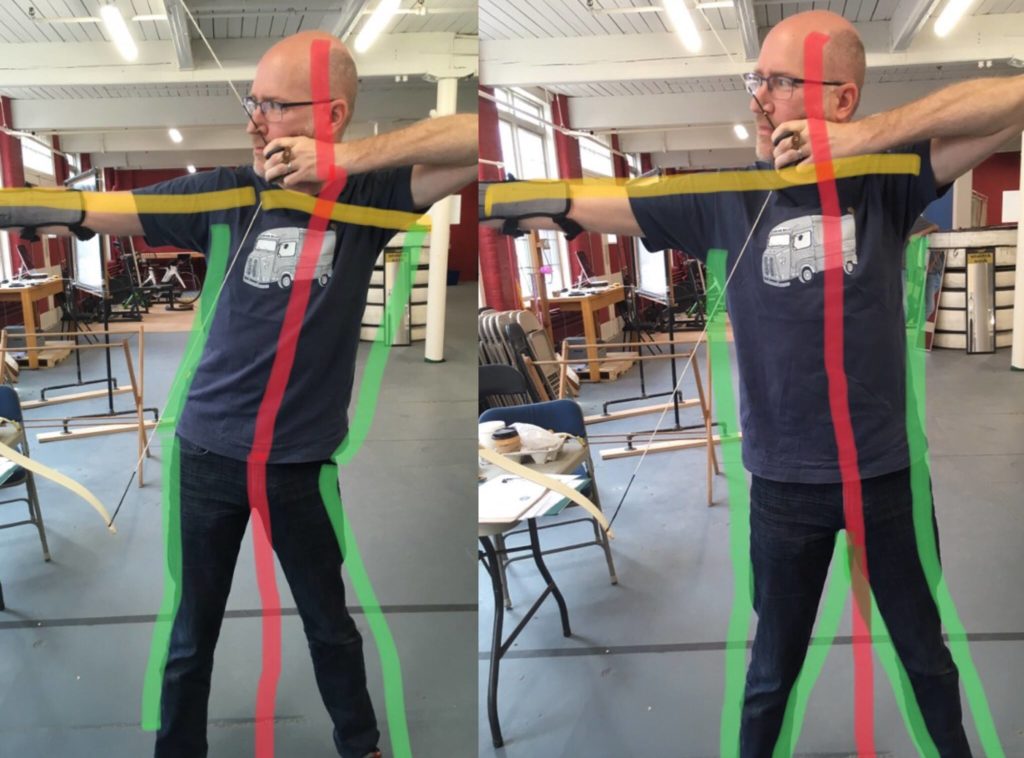
Check out the first photo montage, the ones with the lines drawn on it. The left image demonstrates out of alignment while the photo on the right demonstrates massive improvements and great posture for a beginning archer. This particular archer had the sensation of standing up straight and being in strong alignment in the left photo. Once they were shown the photo on the left, they responded with, “Oh my gosh! Am I really standing like that? Wow, I had no idea! I never would have guessed that.” If you have a good mental representation of what you are trying to achieve, but are not sure what you look like, a mirror, photograph or video frequently provides the type of direct, raw, honest feedback you need to gauge progress. Of course a Coach helps too!
So how did the archer improve their form from the left photo to the right photo? Here is a progression designed to help!
1) Side Plank Progression:
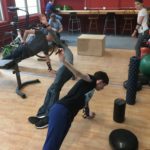 See the photo below of Side Plank. Side planks require you use your lats, triceps, abs and glutes and quads. You have to be engaged fully to be successful with a Side Plank. a) Try a few and hold them for a period of time that is challenging but seems possible. For example, try for 6 reps of 8 seconds each. b) You can try this with a stretch band under the hand on the floor and then get to ‘holding’ using the stretch band while in side plank. Now don’t just “do” these! You have to be aware, mindful, conscious of what the feeling is like to be in a successful side plank. Imprint the feeling. c) Now go to a light weight training bow and then, once successful, your bow and be successful in
“doing the side plank” while standing up, using a bow. What do you have to do to achieve that? What does it feel like and how is it different from what you were doing?
2) Apple Picking:
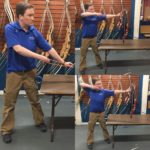 Coach Cerji (blue shirt in the photos below) demonstrates this. Cerji Colvin, Archer This can be guided imagery or a combination of imagery and physical feedback. Imagine you are stuck on one side of a fence and there are apples that you want on the other side of the fence. You can get your hip right up to the fence, but your hip cannot move any farther forward toward the tree because there is a fence in the way. So – to get the apple you have to reach for the apple. I was out of balloons for this photo of Cerji, so we used a roll of painter’s tape (tiny blue roll between Cerji’s hip and edge of table); Place a balloon between your hip and something that is about hip high (a table works for many people). Go from Set to Set Up while “reaching for an apple” yet not increasing pressure on the balloon (or painter’s tape in this case). You could imagine that the fence is barbed wire or maybe “lightly” electric? Maybe not use an egg. Do this over and over until the proper force and direction feel imprinted, then move on to weave in load, anchor and the rest of the shot cycle. Finally, transfer these movements from the stretch band to a training bow and then to your bow.
3) A-Frame House:
Finally, the A-Frame House. An A-Frame house is strong because of the angle of its roof. It can take massive snow loads. The profile of the inside of an archer’s legs, when in proper posture, makes the shape of an A-Frame house roofline. Develop your A-Frame House at Set Position and make it strong because the ‘winter winds and snows’ are coming (the forces that build up during shot cycle; and literal wind, rain). Here is a fun progression: A) Develop and understanding for what A-Frame House is and why it is strong. B) Develop and understanding for what it feels like to be in A Frame House position. C) For fun, and with the right group, develop and understanding for what A-Fram House is NOT – it is not the Backpack Kid Dance (Flossing). https://youtu.be/0Kj3wWKjMSQ . Either do the dance or show it as an example of fantastic dancing but poor A-Frame postures. D) Watch yourself in a long mirror to assess if your A-Frame House is strong or collapsing.
What fundamentals are we striving for?:
A) Both shoulders low and level
B) Spine centered over the A-Frame
C) Body forms a T-position with the drawing elbow not too high or too low, breaking the T shape.
D) Head is tall and the farthest part of the body out towards the toes
E) Bow side may look like it is “winning” or has more energy than the draw side. Joy Lee refers to this as “Letting the Little Kid Win” (the big kid represents the drawing side). In the photo of the man below, he is letting the big kid win in a big way on the left photo.
F) You will feel up to 70% more weight on the bow side foot as you go through the shot cycle and this will begin as you are raising your bow.
G) Drawing side foot will remain rooted and on the ground
H) No FLOSSING while shooting archery.
Have fun and keep in touch. Write in on Comments and let me know if this is helpful.