Day TEN: Online Archery Carnival: Set Up for Success
Welcome to Day TEN of the Online Archery Carnival!
Read the May 24 post for information on the Carnival and how to participate. Each Carnival Challenge will be communicated in the following format.
To participate, complete the challenge on any given day and use the scaled versions if needed. Then, submit a video or photo of yourself to Instagram or Facebook or e-mail to Coach Kyle. Your Facebook and Instagram accounts have to be public, not private, and you need to tag Instagram as @sattva_archery and #archerycarnival2020. Facebook needs to get tagged as @sattvaarchery. If you want to submit via Facebook, post on your own page.
More information in the March 24 blog post.
Title
Set Up for Success
Description of Challenge & Performance
- WARM UP
- 60 seconds Up and Overs
- 60 seconds Sit Ups or Crunches
- 60 seconds Burpees
- 60 seconds Jumping Jacks
- 60 seconds of Side Planks, 30 seconds on each side
- 60 seconds Squats
- 60 Bridge Hold with Gluteal squeeze
- Today’s challenge involves YOU getting into proper alignment as a result of executing Set Up correctly. Can you Set Up for success . . . get it?!
- In this challenge, you must get 2 photos or 2 videos of yourself at the end of Set Up. 1) 1 photo/video: from the overhead perspective, showing you in skeletal alignment. 2) a second photo/video showing your draw side shoulder blade position at the end of Set Up.
- How do you win? Actually be in proper alignment at the end of Set Up and have the photo/video to prove it. Just participating does not mean a “win” in this challenge. You have to perform to a standard.
- Rather than have this challenge include me writing to explain proper Set Up to someone who is totally new – I will provide 3 key points designed to jog the memory of athletes currently training, and leave you to the rest. I will write another blog post or make a video on some other day with all the details of Set Up. I have included a few photos below to assist with what I am looking for.
- In short, Set Up involves doing WORK to do the bow (string becomes more open) as the raising of the bow takes place. At some point during Set Up the archer Coils (rotates the core) above a stable base (glutes and legs engaged) while moving the lower inside corner of the draw side shoulder blade (scapular retraction using lower trapezius) to the spine to anchor it there in preparation for the draw/load phase of the shot cycle. Shoulders must be kept low and level. Lats and tricep on bow side must be engaged to help create a stable “bow side” and pressure point to coil “from”. Skeletal alignment must be achieved by end of Set Up.
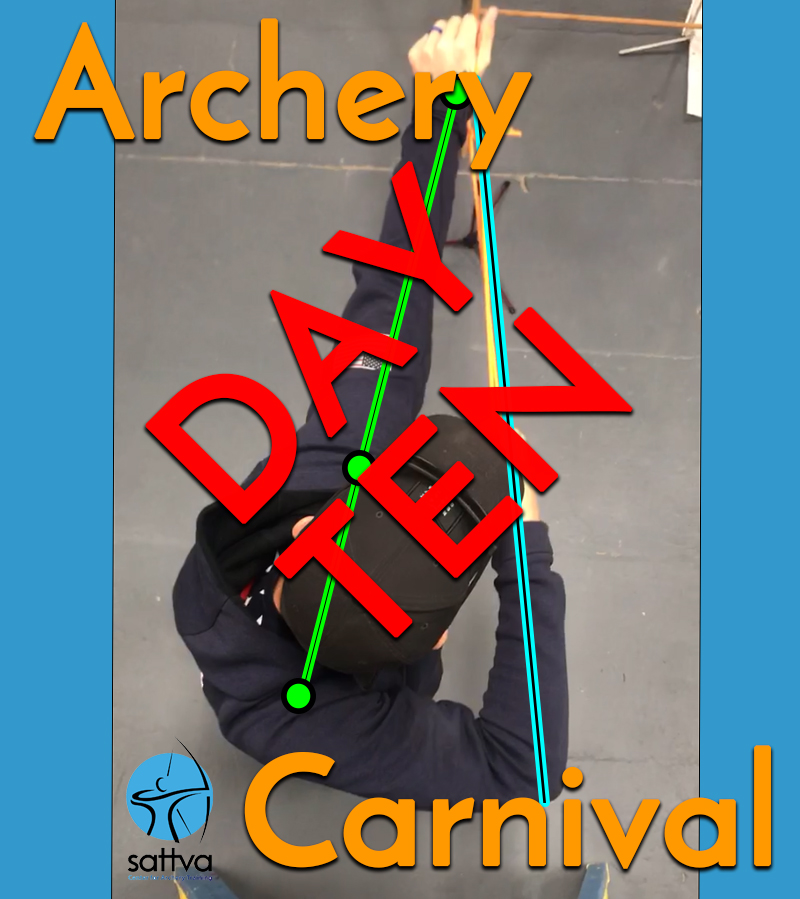
- Photo #2 Below: Overhead Photo of Jake Kaminski with Red, Green and Blue lines/text (scroll down)
- Skeletal Alignment: Here we have Jake Kaminski (thanks, Jake!) at Sattva demonstrating the shot cycle. I took this screen shot from a video I took. The photo shows the end of Set Up. Notice the aligned skeleton (Green line). Skeletal alignment is critical to achieve at the end of Set Up and is also more dynamic than these overhead pictures show. How so? Well, we can only truly assess skeletal alignment in a 360 degree view and these photos only provide an overhead view. Your overhead photo might look OK, but one shoulder could be too high. For this challenge, and for keeping things simple, focus on getting the green line (photo below).
- Skeletal alignment is achieved by combining the two movements outlined below:
- Draw Side Shoulder Blade: Red arrow and text. Draw side shoulder blade should be as far against spine as you can get it at the end of Set Up. There are two times that we talk about shoulder blade movement: 1) Set Up (get it 100% of way to spine), and 2) Anchor (back tension increases so shoulder blade will tighten a little more towards spine). To be clear, its not the top corner of the shoulder blade or even the middle of the blade that we want to lead with to the spine. Rather, the lower inside corner of the shoulder blade wants to move/arc towards the spine. The lower trapezius is the muscle we are searching to use for that movement. If we only see scapular movement at two times (Set Up and Anchor), then the shoulder blade should be anchored into position against the spine and not move during the drawing/load cycle.
- Coiling: Coiling is the term used to describe twisting of your core, above a stable, motionless lower body (pelvis/legs). A baseball player coils to when at bat or when throwing. A tennis player coils and harnesses energy from their core when serving or using forehand or backhand. A paddler uses core rotation to do WORK in order to move the boat forward through water. Martial artists of all types learn to use core rotations in order to be maximize power and efficiency. Modern archery is the same way. Coil your body to do WORK to the bow system and to align your body with the target (since you are using an open stance). Coiling can take place during the raising of the bow (coiling up) or it can take place as you lower the bow back down to shoulder height (coiling down).
- Skeletal Alignment: Here we have Jake Kaminski (thanks, Jake!) at Sattva demonstrating the shot cycle. I took this screen shot from a video I took. The photo shows the end of Set Up. Notice the aligned skeleton (Green line). Skeletal alignment is critical to achieve at the end of Set Up and is also more dynamic than these overhead pictures show. How so? Well, we can only truly assess skeletal alignment in a 360 degree view and these photos only provide an overhead view. Your overhead photo might look OK, but one shoulder could be too high. For this challenge, and for keeping things simple, focus on getting the green line (photo below).

Left Side: Here the archer is at the end of Set Up, but has not achieved Skeletal alignment, the Hook wrist is collapsed in, and the draw side elbow is outside the line of the arrow. Right Side: Here we have the same archer, same day, making marked improvements. Shoulders are in alignment, scapula has moved towards spine, draw elbow is in line with the arrow/band, Hook wrist is in alignment, coiling is more complete. Its hard to tell from the overhead view, but the upper trapezius muscles are over activated in both of these as well. So although ideal skeletal alignment has not yet been achieved, you can see the improvement.

Here we have a screen shot of a video I took of Jake Kaminski going through the shot cycle while at Sattva. Screen shot captures the end of Set Up. Thanks Jake! Green Line: demonstrates skeletal alignment of bow wrist, bow shoulder, draw shoulder. Red Arrow: the lower inside corner of the draw side shoulder blade must move 100% towards the spine during Set Up. This is a scapular retraction using the lower trapezius. Blue Line: The draw side elbow should be in line with or inside the line of the arrow/stretch band. In this photo, Jake’s drawing elbow remains in line with the stretch band.

Here we have Jake at the end of Anchor, I believe. Notice that skeletal alignment remains intact and the draw side elbow remains in alignment with the arrow or stretch band (or slightly inside of it).

Here we have an athlete at the end of Set Up. Good skeletal alignment from bow side wrist through draw shoulder. Good coiling (notice the direction the feet and hips are pointing compared to the direction the sternum is pointing). Draw side Elbow is slightly outside line of arrow.
Knowledge Outcome
- Archer knows what skeletal position needs to be achieved by the end of the Set Up phase of the shot cycle.
- Archer knows concept of how to raise bow, coil, retract scapula and draw elbow alignment for Set Up
Skill Outcome
- Archer can identify (by looking in a picture) if they are or are not achieving skeletal alignment at the end of Set Up
- Archer can feel when they achieve proper alignment vs when they are not aligned properly.
- Archer can achieve or is working towards proper alignment at end of Set Up
- Archer’s shoulder blade DOES NOT move during the draw/load phase of the shot cycle.
Materials Needed
- Bow or stretch band or just use your body
- Camera and a way to get photo or video of you from directly overhead
Criteria for Assessment & Feedback
- Self Assessment #1:Raising the Bow: Does the distance from the pivot point of the bow to the string of the bow where it is hooked keep increasing with every movement of the Set Up step?
- Example for an archery who is roughly 5’6″: At Set position, perhaps the “brace height” is 11 inches. Half way through raising the bow, the brace height might be more like 14″. As you reach the top of Set Up it may be 18″. Then, as you finish Coiling – brace height (for lack of a better term) may be closer to 21″ as Set Up comes to a close.
- The two different movements described above (1) bow hand moving up and away from body in an arc, 2) draw hand following a vertical path to the shoulder) automatically increases the distance between the archer’s hands – increasing the amount of WORK that is being done. Make sure you are not simply raising the bow and “chasing the brace height” with the hook hand. The “brace height” (distance between pivot point on grip and string when at resting position) should keep increasing with every small incremental movement. That distance (pivot point to string) should never decrease at any point in time once the shot cycle begins.
- Self Assessment #2: Does my bow Hook wrist stay in the same alignment established during Set, or does it collapse inward? This can be seen in the split image above, left image, notice the collapsing wrist on the left compared to the more aligned wrist on right.
- Self Assessment #3: Does my drawing side elbow stay in line with or slightly inside the line of the arrow/stretch band? The images of Jake Kaminski above demonstrate this, as well as the top image/split image (right side). The woman in the gray tank top is very, very close. Split image at bottom
- Self Assessment #4: Does my shoulder blade move towards my spine during the Drawing/Load phase of the shot? If so, then you did not move it over far enough to the spine at Set Up.
- Self Assessment #5: Do I achieve skeletal alignment from above? Both shoulders low and level?
- Self Assessment #6: Can you do this with your bow? If not, can you do it with your stretch band? If so, perhaps dropping down in bow draw weight is needed as you increase the threshold capacity of your lower trapezius muscle and build proper neural pathways.
Scaled Options
- Use your stretch band.
- Use your body
- Scale the Warm up if you want too!
Video or Photo Submission Criteria for this Challenge
- Photo or video: Get two photos or two videos showing: 1) overhead view of skeletal alignment at end of Set Up, 2) view of your drawing side shoulder blade at the end of set up. Grab a quarantine buddy to take the photos for you.
- Post to Instagram and use #archerycarnival2020 and @sattva_archery (underscore). or to your Facebook page (make it public) and mention/tag @SattvaArchery (no underscore) ….or just e-mail or text Coach Kyle photos/videos.