Day 14: Online Archery Carnival: Brace Height Challenge
Welcome to Day 14 of the Online Archery Carnival!
Please note: we DO NOT have a winner, yet, for the Day 10: Set Up for Success Challenge. I will continue to accept entries until I receive one that demonstrates a) skeletal alignment achieved at Set Up and b) that skeletal alignment remains unchanged during draw and anchor. I need an overhead picture of you at the end of Set Up and then again at the end of Anchor; or a video of your whole shot cycle. You’ll likely need your quarantine buddy to take the photos or video for you. Can use bow or stretch band or just your body.
Read the May 24 post for more information on the Online Archery Carnival and how to participate. Each challenge is scalable (adjustable to fit your skill/motivation/equipment).
Title
Brace Height Challenge
Description of Challenge & Performance
- Quotes for your Training Today
- In a wide variety of human activity, achievement is not possible without discomfort – Endure: Mind, Body, and the Curiously Elastic Limits of Human Performance
- There is one fundamental truth about any sort of practice: If you never push yourself beyond your comfort zone, you will never improve – Anders Ericsson, Peak: Secrets from the New Science of Expertise
- WARM UP: Arrow Proof your Core (Scale as needed. As designed, this should leave you sweating, breathing very heavily, and very warmed up). Whole body warm up with focus on core.
- 60 seconds Up and Overs
- 27 Sit Ups (I recommend AbMat sit ups) Demo
- 27 Air Squats, body weight. Demo
- 27 Mountain Climbers (counted on one side). Demo
- 60 seconds Jumping Jacks (use this as active recovery)
- 12 Burpees. Demo
- 18 Sit Ups
- 18 Air Squats
- 18 Mountain Climbers
- 60 seconds Jumping Jacks (use this as active recovery)
- 8 Burpees
- 9 Sit Ups
- 9 Air Squats
- 9 Mountain Climbers
- 60 seconds Jumping Jacks (use this as active recovery)
- 4 Burpees
- Brace Height Challenge
- A guitarist or any other stringed instrument player would not dream of taking their stringed nstrument out of the case and expect perfect note-worthy performance if they did not take the time to make minor adjustments to the tune of the instrument. Tuning a stringed instrument is something all of us can appreciate and imagine needs to be done prior to playing the instrument IF you want to get consistent and proper notes from the tool. A bow is a stringed instrument. We are looking to get consistent performance from our (stringed) instrument each time we use it – so we must check in with the Brace Height every time, every time we assemble out bow.
- Brace Height is one part of basic tuning. This Challenge is merely intended to illuminate the importance of Brace Height and the fact that even beginner archers can “feel” and “hear” the difference brace height changes can cause even if they cannot see clear performance differences yet. Other steps of tuning such as: limb alignment, center shot, draw weight, tiller split, arrow rest, and nock point height, prior to Brace Height. In other words, going through this Challenge will not “tune” your bow. Rather, it will hopefully get you more comfortable with your equipment and help you find a brace height that feels better than what you are using now (or confirm the current brace height).
- Terms: Brace height defines the distance between the pivot point of the grip (narrowest portion of grip) and the point of the string that is perpendicular to the pivot point. Also know as “string height”. Some people measure brace height from the cushion plunger because that measurement will not change, ever. Whereas if you add grip tape to your grip or change grips on your riser your brace height measurement will change.
- Goals: To learn, through experience, how changing brace height will impact equipment performance and to be able to answer the question: what brace height seems to feel best for me?
- Tips & Process:
- Brace Height, Velocity and Plunger: Changing your Brace Height will change the velocity of your arrows, thus requiring a plunger tension adjustment. A shorter brace height makes arrows faster as the “power stroke” of your string is longer, making the velocity of the arrow greater.
- Tiller and Nock Point: Changing Tiller (limb bolts getting screwed in or out) will definitely change your nock height location, changing brace height does not typically affect nock point location – but check in with it anyway.
- Tiller and Draw Weight: Changing Brace Height does NOT change draw weight at the fingers during Holding. Tiller bolts (limbs bolts) change draw weight.
- Add twists to your string to increase brace height.
- Remove twists from your string to decrease brace height.
- Always use the same bow square as the measurements are not universal on all bow squares.
- Always measure the brace height on your bow the same way. IE: T-portion of bow square against grip or T-portion of bow square clipped to string.
- Tools:
- Owner’s Manual
- Bow Stringer
- Bow Square. If you don’t have a bow square, use a ruler for this activity rather than not participate at all
- Process:
- Determine the manufacturers recommended “brace height range” in the owner’s manual for the riser of your bow. 8 1/2” – 9 1/4”, for example, is a common range for 68” bows.

Common Brace Hight Ranges for ILF style Recurve Bows. For those of you with a 62″ bow, have your starting Brace Height be 8″ with a range of 7 3/4″ – 8 1/2″.
- Measure your brace height with a bow square and compare this first measurement to the manufacturers recommended range.
- De-string your bow, using a bow stringer, and remove twists from your string until the brace height is at the lowest value (not the “Start here” value) of the stated brace height range for the size of your bow.
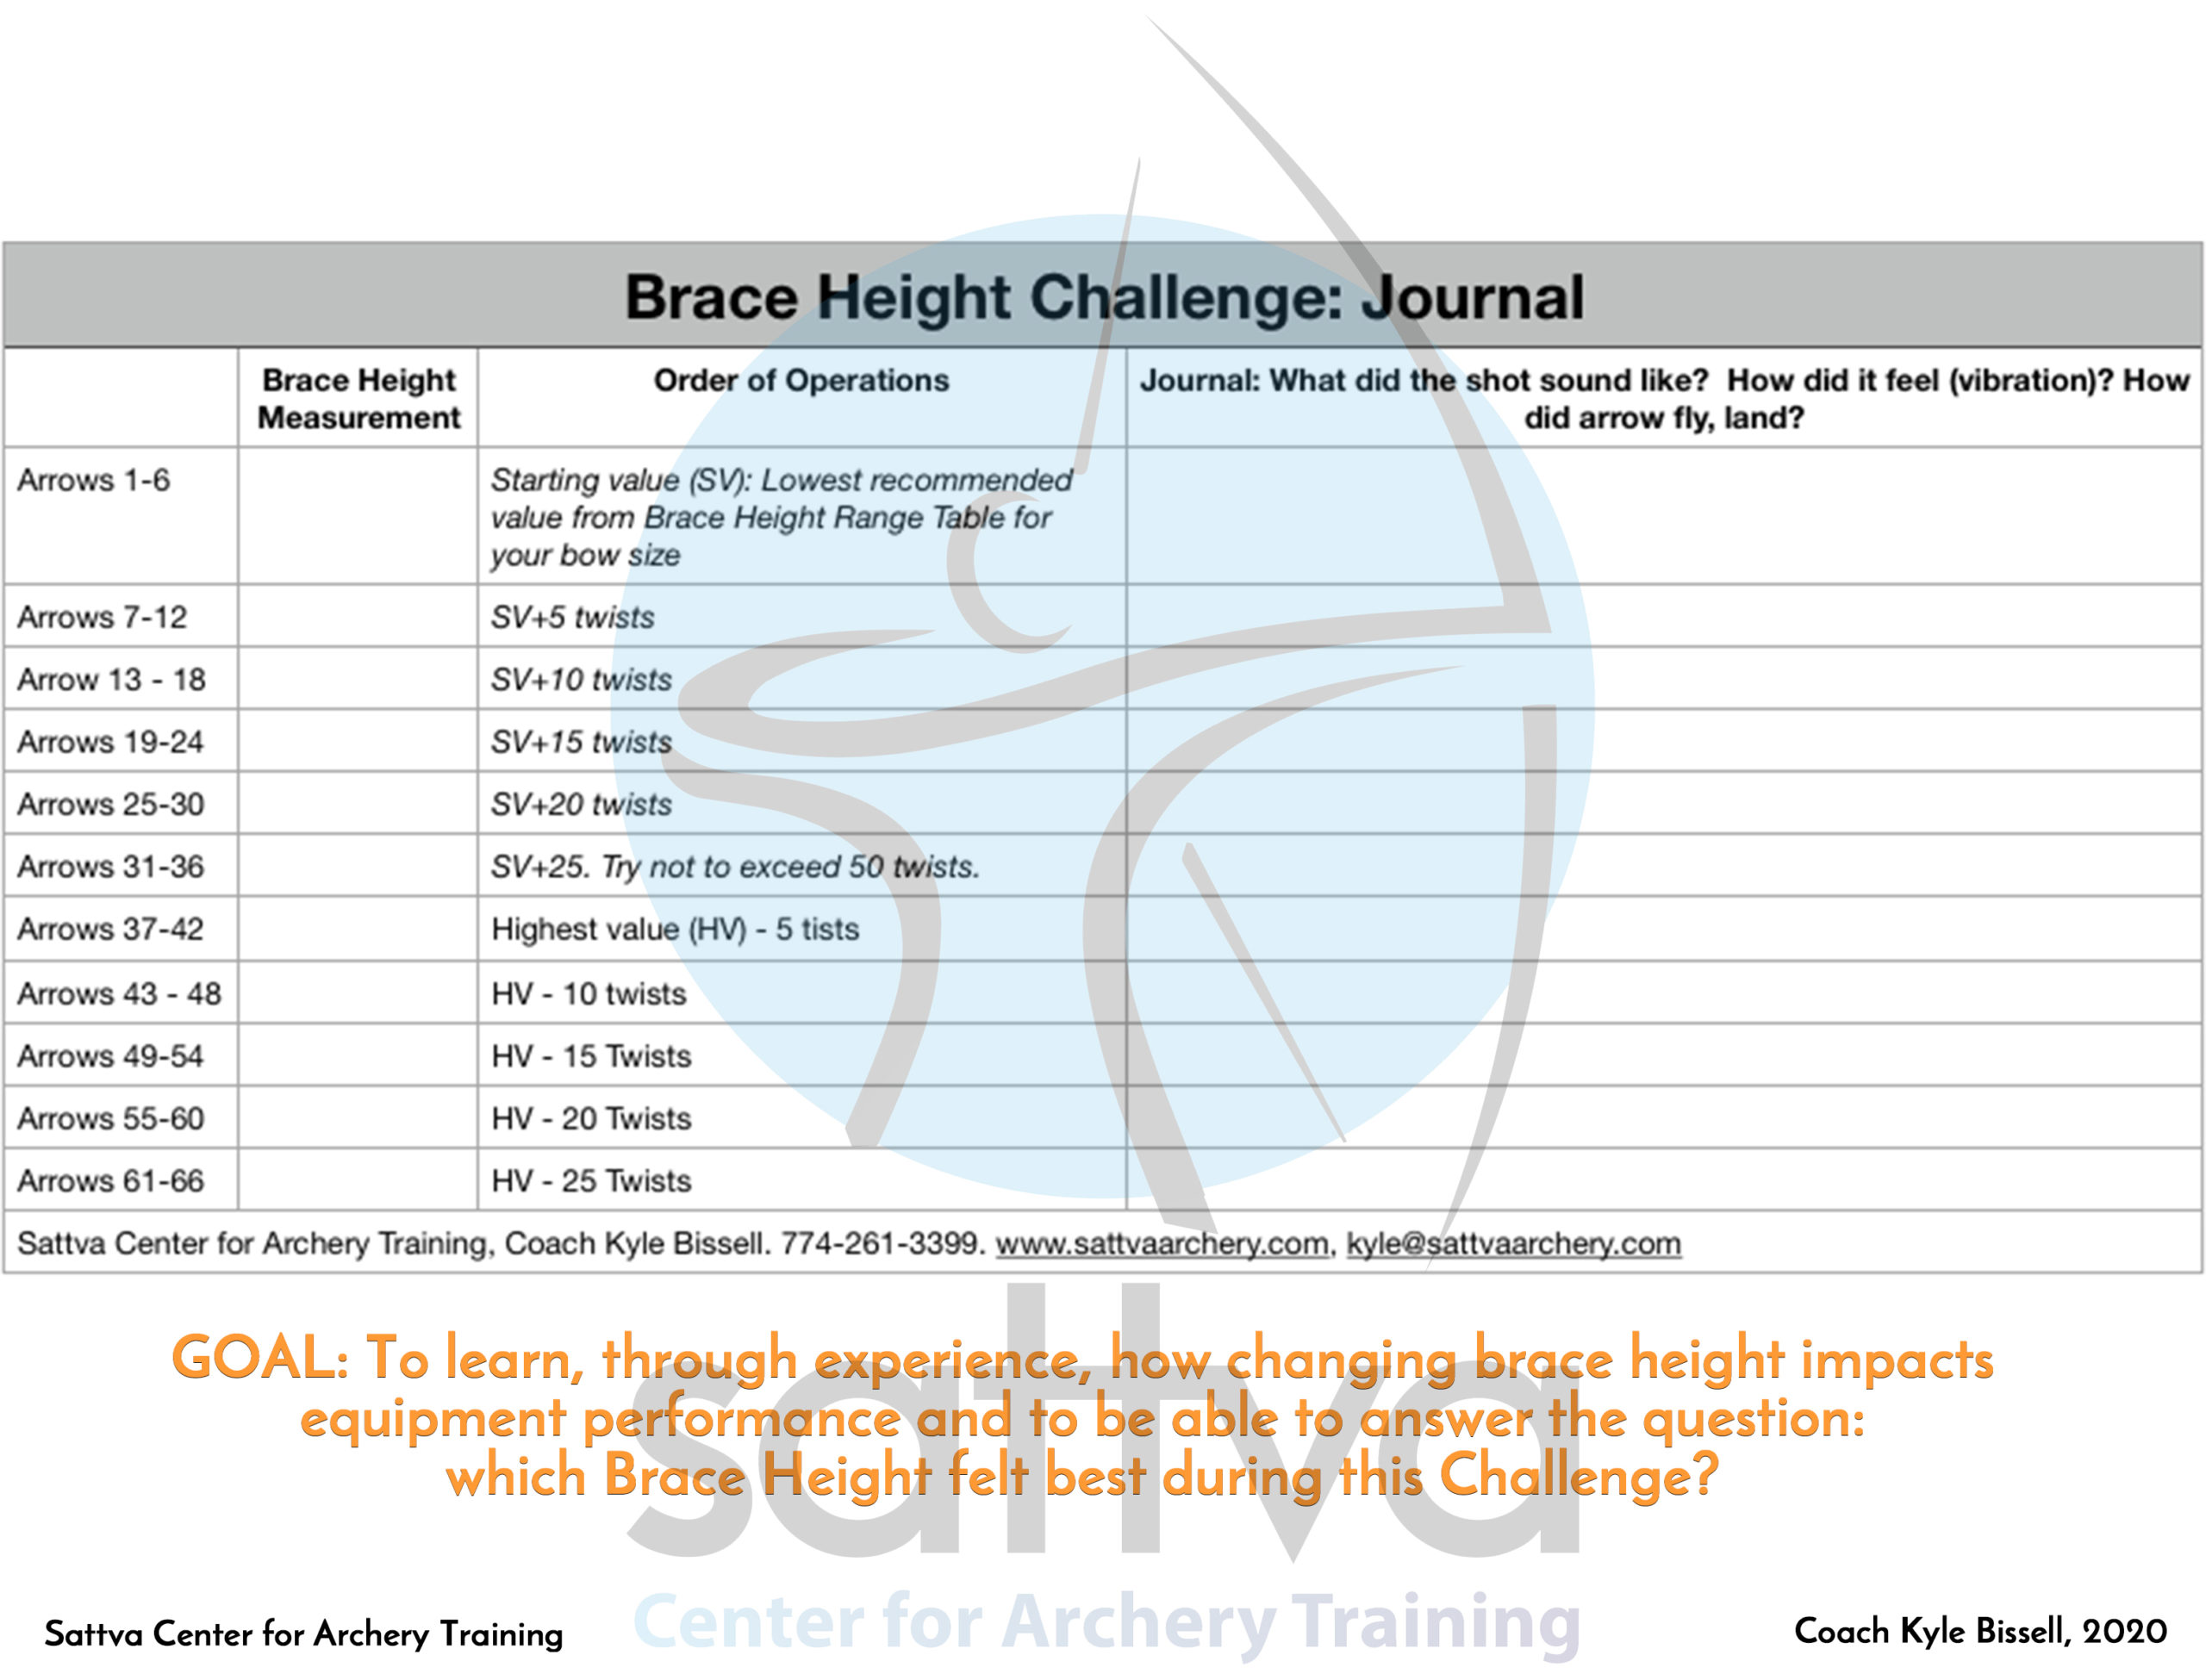
- Shoot an end of six arrows, noting the sound and feel of the bow. Journal, using the sample journal below, and log the sound and feel your experience at this particular brace height. Retrieve arrows.
- De-string bow using a stringer and Add 5 twists to the string. Measure the new brace height (log this measurement in the Journal) and shoot an end of six arrows. Journal what you felt and heard. I find that adding 5 twists add approximately 1/8″ to the brace height.
- Repeat this process until you are at the upper value of the recommended brace height range. Try not to exceed 50 twists.
- Work your way back down the brace height range ladder until you find the point where the feel is great, the sound is good and the performance seems optimal. Record that number as your new baseline brace height. You may return to this later after you learn more about other tuning factors. For now, every time you set up your bow, measure for that brace height and adjust your string accordingly.
- How close is your “optimal” brace height from the value in the “Start Here” column in the Brace Height Range Table above?
- Determine the manufacturers recommended “brace height range” in the owner’s manual for the riser of your bow. 8 1/2” – 9 1/4”, for example, is a common range for 68” bows.
Knowledge Outcome
- Archer will know how to increase and decrease brace height
- Archer will know how a smaller brace height will impact arrow flight
- Archer will know what the brace height range is for their size bow
- Archer will know what brace height they should be measuring for each time they assemble their bow
- Archer can describe how the bow feels different when shooting with a very small brace height compared to very high brace height.
- Archer knows how to use a bow square
- Archer understands that Brace Height is one step of tuning a bow and that, commonly, many other steps of tuning come before Brace Height (limb alignment, center shot, draw weight, Tiller, etc)
Skill Outcome
- Archer can competently increase and decrease brace height
- Archer can measure brace height consistently
Materials Needed
- Bow, Arrows, Target
- Bow Square or ruler (not optimal but you will certainly meet the goals of this Challenge by using one)
- Paper and Pen/Pencil
- Sattva Brace Height Journal
- Sattva Brace Height Range Table
Criteria for Assessment & Feedback
- What did I notice about the sound of the bow/shot in the lower brace height value “shots” compared to the shots with higher brace height values?
- Same question as above except: how what the “feel of the shot” different?
- What was the brace height that felt best for you? Why did you like that brace height?
- What is the recommended brace height range for your bow? Is the brace height value that you like the best within that value? Where?
Scaled Options
- Scale the warm up however you need. Its a good one for sure!
Video or Photo Submission Criteria for this Challenge
- Photo or video: 1) Get a photo of your Journal and your bow together and submit that. Also get a photo of you shooting archery or your arrows in the target to submit.
-
Your Facebook and Instagram accounts have to be public, not private, and you need to tag Instagram as @sattva_archery and #archerycarnival2020. Facebook needs to get tagged as @sattvaarchery. If you want to submit via Facebook, post on your own page and let me know.